The content in this guide is currently being revised to align with the new user interface. Some text and images may be outdated.
When to use Retainers
Manage your Support Contracts and your ongoing client work within a Retainer. Auto-populate all of your recurring tasks and materials, billable rates, and allowances for each of your Retainer Periods, saving you time on overhead administrative work.
In one easy-to-use place, connect your related Tickets and Projects to your Support Contracts so you can easily track the details, usage, and budget of your completed work. Allow your clients to follow your progress through Activity Reports and within their Client Portal.
Setup your retainer billing with our flexible allowance types no matter how you collect payment from your clients, whether a monthly upfront payment or at the end of the month after you've performed services. If you bill upfront for services, use Retainers for automatic invoicing at the beginning of each period.
Utilize Retainers when it involves recurring work, such as:
- Payroll or Bookkeeping Services
- Domain Name & Web Hosting Services
- Digital Marketing Services, such as Ad Buys, SEO & Blog Postings
- Support Services
- Post-Paid IT / Managed Service Support
Click Next to define your Retainer Details.
Try it Yourself: Create a new Retainer
If you've already set up your trial account, you can create a new retainer right now and start testing to see what a typical retainer page looks like.
With retainers what you’ll be doing is defining agreements you have with your clients - how much you bill them, how often you bill them, how you budget your work against that, and of course setting up all their recurring tasks to go along with it.
Save yourself time by setting up a recurring templated Retainer Period, which will automatically repeat going forward. There are multiple sections in a Retainer Period Template, allowing you to refine all the details of your recurring Retainer Periods.
In the next lessons we’ll walk you through each of the sections when you setup your Retainer: Defining Retainer Details, Setting up Retainer Period Templates, and Creating Recurring Tasks & Materials - all of which you define when you set up your Retainers.
-
There are two ways to create a new Retainer:
a. Click the +Add button in the Navigation Bar and choose Retainer.
 b. From the Company or Contact page, click the Add button on the Client Menu bar and choose New Retainer.

-
Choose a company to create the Retainer against.
-
Define your Retainer (Support Contract) Details, Retainer (Support Contract) Period, and Recurring Tasks/Materials. We’ll go over each of these in the next lessons.
-
Click Save and you will be taken to the Retainer Page.
Click Next to define your Retainer Details.
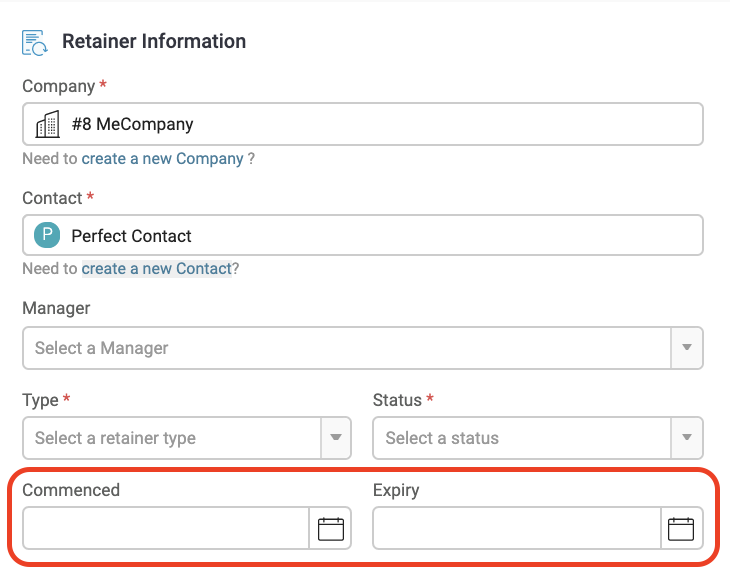
Define your Retainer Details
Start building each of your Retainers by defining the details that are important for your ongoing work, including when they Commence, who manages the retainer, and billing details of the Contract.
Each Retainer will typically have multiple periods, up until your Retainer is set to expire. When you set your Commence Date and Expiry Date these are for the overall support contract, not just for a specific Retainer Period. For instance, if you want your recurring Monthly periods to begin on the first of the month, make sure your Commence Date is set to the first of the month (i.e. - January 1st).
Your Retainers are divided into Periods based upon your billing cycle, whether Weekly, Monthly, Quarterly, or Yearly. Your periods are where you log your work and track your usage.
You can choose to Auto-Renew your Retainer Periods, which will automatically create the next billing period when the current period ends. These periods will populate based upon how you have setup your Retainer Period template.
If you consistently invoice for the same amount at the beginning of each period, take advantage of Auto-create invoicing and save time on overhead costs. Define your Billing Contact, Service Ledger and Tax Code up front for the services you will be performing.
Click Next to learn how to setup your Retainer Period template.
Retainer Types
Use Retainer Types, a Premium feature, to setup Retainer templates based upon the services you offer. Depending on the Retainer Type you chose when creating your Retainer, details of your retainer will automatically populate, including retainer tasks, billable rates, and invoicing schedule.
Setting up Period Templates
Your Retainers are divided into Period Durations based upon your billing cycle (Weekly, Monthly, Quarterly, or Yearly) and are where you log your work and track your usage.
Configure your retainers to fit the Duration you have agreed to provide service to your clients, whether for Fixed period of time (weekly, monthly, quarterly, annually) or Unlimited. Your periods are like a bucket where you can link your tasks, tickets, and projects and easily track your work no matter where it’s logged.
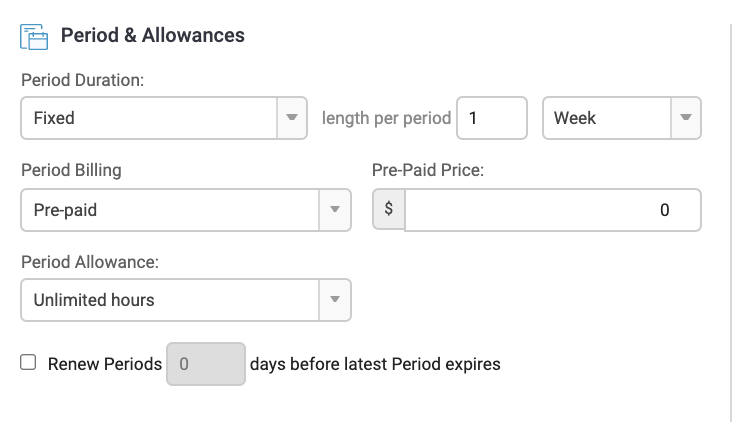
Choose to set your Billing with either an upfront Pre-paid fixed cost, or choose Post-Paid and charge your clients at the end of the period based upon the work you log.
If you choose a Pre-paid fixed price, you can choose an associated Usage Allowance - the way you account for the amount of services you are providing. Choose whether you charge your client for a fixed amount of hours, a fixed value of the services you are providing that period, or even if you give them an unlimited amount of time and value for your services.
For instance, if your client pays $500 a month for 10 hours worth of support, you would set this up with a Fixed period with a length of 1 Month. Set a Pre-paid price of $500 (ie - $500 a month), and your Pre-paid Allowance would be Fixed Hours and include 10 hours of Pre-Paid services.
You can also choose a Post-paid allowance to charge the client at the end of the period for the amount of work your team has logged. Decide on an Override Rate, or the hourly amount you want to charge for the time you log in this retainer.
If you charge a set rate in your Retainer (ie - no matter who logs the time you will be charging for set hourly rate), then you want to Use Retainer Rate. Define that rate below in the Fallback Rate field, where you choose from all your Billable Rates including any set Staff Rates.
If you set your rates within your linked Tickets and Projects, choose instead to Use Object Rate. When you create Tickets and Projects, you can define your own Budget. If you want to keep that budget instead of a setting an hourly rate within the retainer, then use this option.
Click Next to learn how to setup your Recurring Tasks.
Rollover and Charging for Overages
Choose to Rollover unused allowance into the next period for your Pre-Paid retainers with a fixed allowance. If your client only uses 5 of the allocated 10 monthly hours of support service, choose Yes to Rollover the remaining 5 hours to their next month. If your client goes over their monthly allowance, set an Excess Rate and invoice for these overages at the end of the month.
Recurring Task & Materials
Within each Billing Period, you can template out the hours and rates, and also set up Recurring Tasks and Materials.
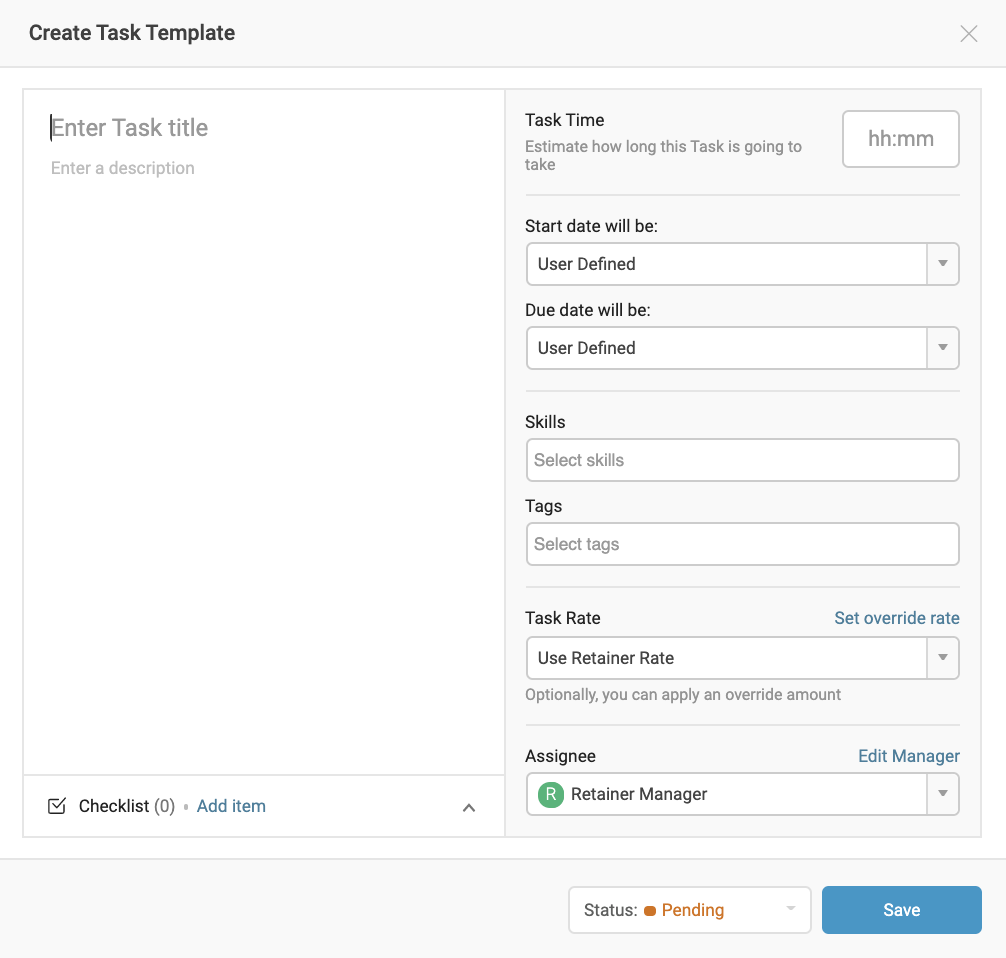
Define any tasks you wish to be created automatically each Period by adding clicking +Add Task Template at the bottom left of the screen.
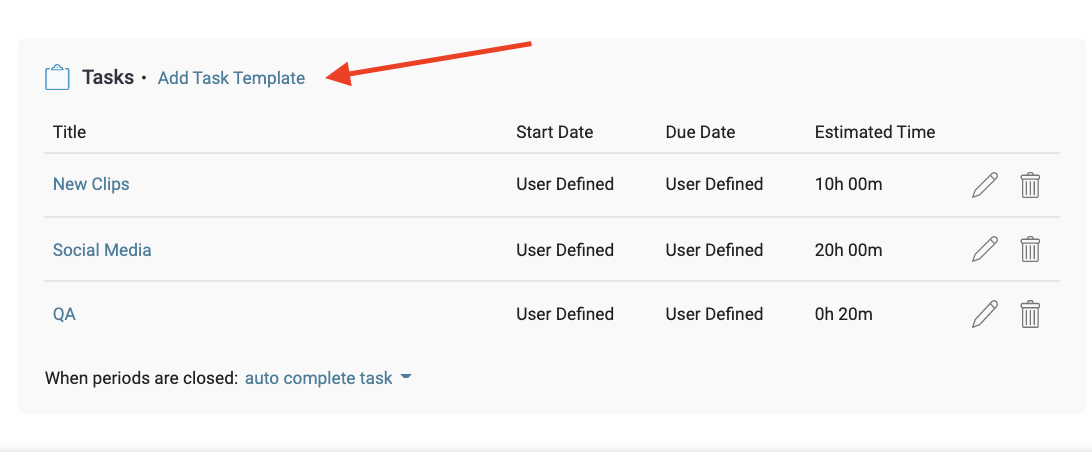
For instance, if you always Run Payroll at the same time of the month, or know you will need to Create a Monthly Newsletter, you setup a task to pre-populate, saving you overhead administrative costs. Define specific Managers and Assignees, set up the start and due dates and an estimated budget of time. Read more about creating Recurring Tasks.
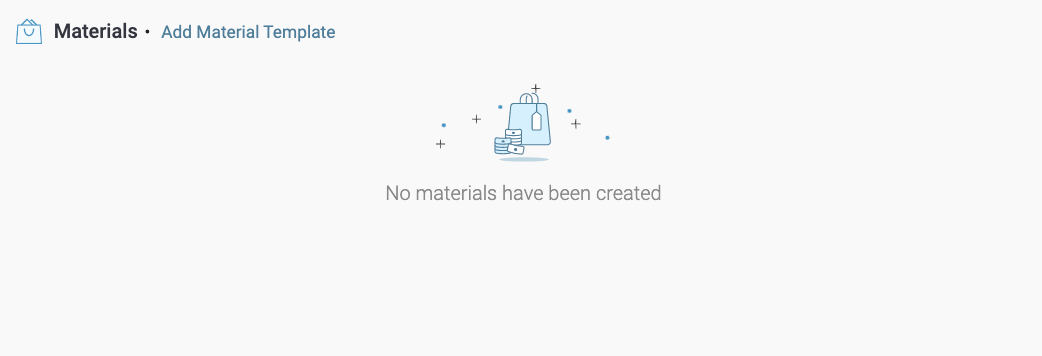
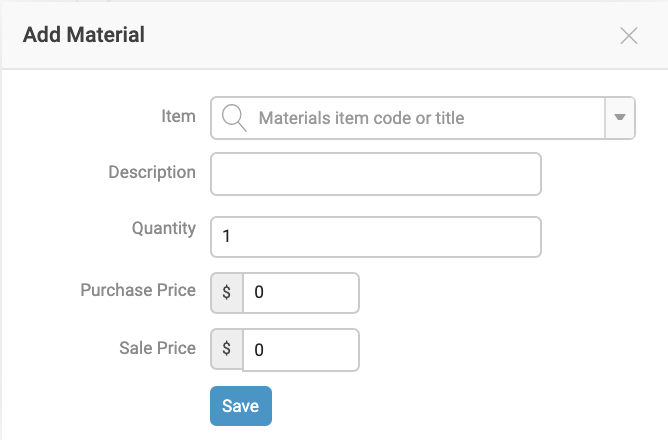
Define any necessary recurring fees, such as any additional charges/products/licenses that will automatically generate on your Retainer when each new Period under your retainer Materials.
Click +Add a Material Template at the bottom right, where you can define the Amount you charge for this Material, the internal Cost of the Material, as well as any billing details.
Click Next to see the components of a Retainer.
Pre-Creating your Periods
When defining your Retainer’s Details, there is an option called Auto-Renew X days before latest period expires.
By renewing your periods before the last period expires, your recurring tasks and materials can pre-populate ahead of time for the following period. This allows you to look over the period and verify all the details are correct, make any necessary changes, or add new tasks specific to only that month.
If you have a Pre-Paid Retainer, your invoice can also be generated before the end of the next period. Auto-renewing before the last period expires will not change the start or end date of the period.
Anatomy of a Retainer
Any time you open your Retainer, find a snapshot of all your Retainer information separated in a two column format. On the left column you will find all Retainer Details, and the right side you’ll find template details, Usage metrics, and ways to manage your ongoing work.
Each Retainer page helps you track the current Status of your Retainer, the Usage details across each of your Retainer Periods, a list of all Periods, upcoming work, invoice history, and general details of the Support Contract.
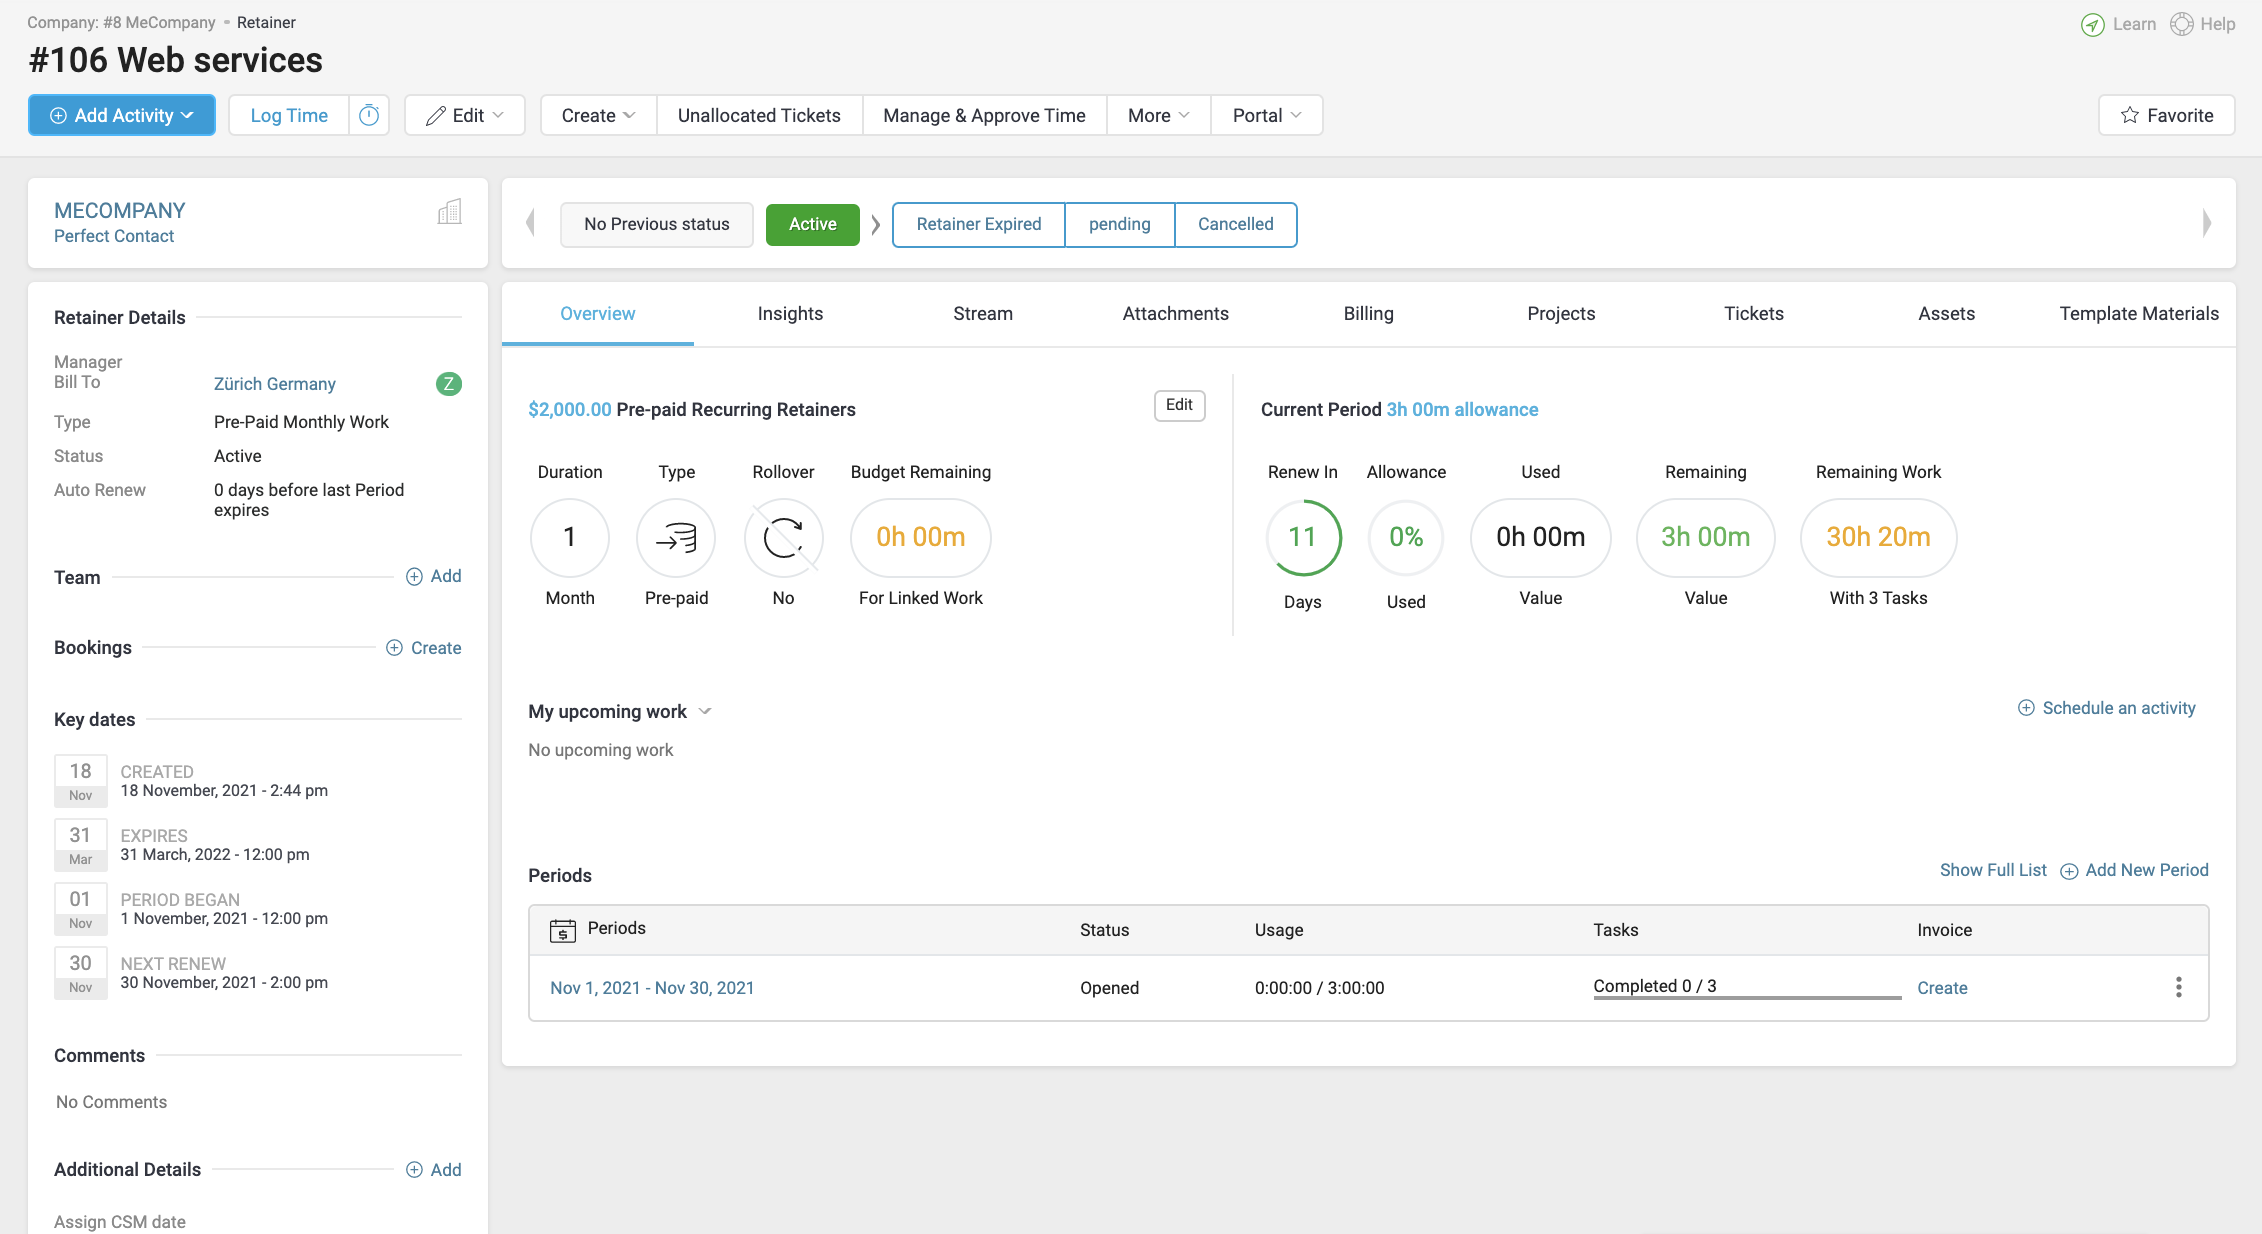
The Overview tab is shown by default. In this section, you can see a summary of the Retainer Template and ongoing Retainer Periods. These details are used to build future periods until the expiry date, including the Duration, Type (pre-paid or post-paid), whether you’ve opted into Rollover, and whether you have opted into Auto-Renewal. Your Current Period’s Allowance is detailed by showing Percentage Used, Used Value, and the Value Remaining, so you can open it at any time to track its progress. You can click Edit and then Edit Retainer to edit these details, templated tasks and materials.
Note: When editing tasks and materials on the Retainer, they won't be changed in already existing periods. Changes will be applied moving forward.
The heart of every Retainer is each Retainer Period. On the bottom of a retainer’s overview you can track and compare each period’s Usage and see the period Status, Start and End dates, and have a quick click to create or view the Period’s Invoice.
Your Retainer Work is separated by tabs. Open this page at any time to quickly see any correspondence with the client across all Retainer Periods, and any upcoming work to be done, and all related Projects and Tickets.